Customize column headers (in Multi Comparative)

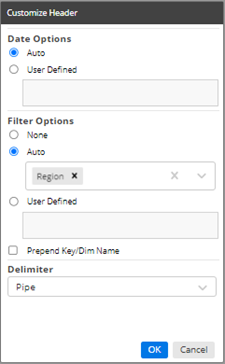
Multi Comparative widgets can show multiple date range columns with different filters applied to each one; therefore, you may want to customize the headers to help users understand what they are viewing. Each top-level header can include the date and filters that are applied. "Auto" options are available to automatically update the headings based on the context of the data.

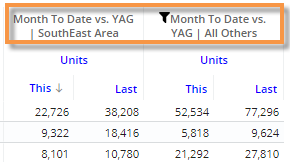
Tip: In addition to customizing the top-level column headers as shown below, you can update This/Last column headers to show more information about the date range.


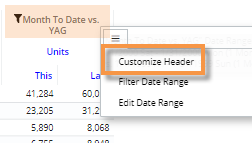
To customize top-level column headers (in Multi Comparative) 

  1. In a Muti Comparative grid, place the cursor over the column and click the  menu icon.

  2. Select Customize Header.

  3. In the Date Options section, choose how to represent the date range:
    Auto - uses an automatically generated string based on the column date range (e.g., Month To Date vs. YAG).
    User Defined - lets you enter a string to represent the date range (will not automatically update).

  4. In the Filter Options section, choose how to represent the filters that are applied:
    None - does not show filters in the header.
    Auto - uses an automatically generated string based on the current filter. To use this option, click the Auto button and then select the dimension/key(s) for which to show filters. (At least one filter must be on in the workspace, widget, and/or column.) For a single member, this option will show the name of the member (e.g., SouthEast). For multiple members, the header will show the number of members (e.g., Region 2 selected) or All/All Others. You can also show the dimension name by checking the Prepend Key/Dim Name box.
    User Defined - lets you enter a string to represent the filter (will not automatically update).

  5. Select a Delimiter to separate the date from the filter in the header.

  6. Click OK.

Tip: The custom header defined here will override any header assigned in the date setup area.