Group By Attributes
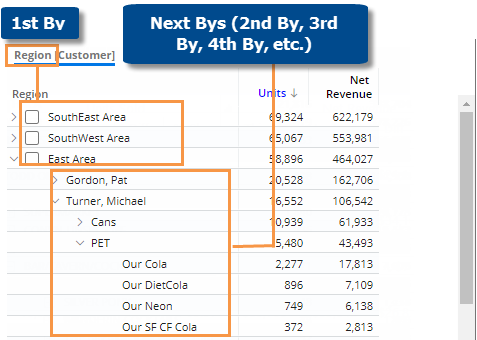
You can select how data is grouped (i.e. Group By) in widgets that compare members. The 1st By is the attribute used to group data at the highest level. Additional levels of attributes (2nd By, 3rd By, etc.) become visible as you expand members or drill down. (Group By selection may be turned off.)
|
To select the 1st By
|
-
Click the By in the breadcrumb path (underlined). If the widget only has one Group By dimension, this will take you directly to the Group By window, where you can edit dimensions.
-
In the pop-up menu, click the name of the dimension to use for grouping the data at the highest level. To search for a dimension, enter the first few characters at the top of the menu. This menu includes dimensions that were built into the widget during dashboard creation. If you do not see the dimension in the list, click on Edit Group Bys to access more dimensions.
Tip: You can click  to turn on auto-expand for a dimension. This will expand all members to the next By. The results will be different depending on the type of view: standard grid (i.e., tree); flat view grid; or expanded graph formats. to turn on auto-expand for a dimension. This will expand all members to the next By. The results will be different depending on the type of view: standard grid (i.e., tree); flat view grid; or expanded graph formats.
|
|
|
To select the 2nd By, 3rd By, etc. (i.e. downlevel order)
|
-
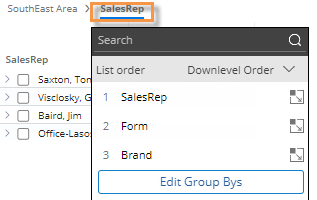
Click the By in the breadcrumb path (underlined). If the widget only has one Group By dimension, this will take you directly to the Group By area (see below).
-
In the pop-up menu, click on a number and select from the drop-down to adjust the drill order, or click and drag to place dimensions in the desired order. If you do not see a dimension in the list, click on Edit Group Bys to access all available dimensions (see below).
-
Click OK
|

|
To edit the Bys
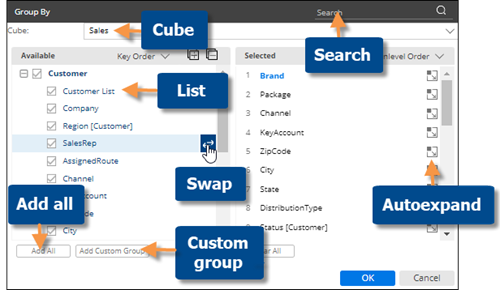
After clicking on the Edit Group Bys button in the menu (see above), you can access all dimensions.
-
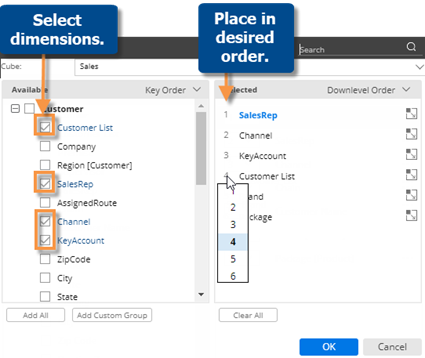
Check the box(es) of the dimension(s) you wish to use for grouping the data at any level (1st By, 2nd By, 3rd By, etc.). If the desired By is not listed, you may need to change the data cube at the top of the window.
-
In the right pane, place the selected dimensions in the desired order for grouping data, drilling, and expanding members. You can drag and drop dimensions or click the dimension's number to select from a menu.
-
Click OK.
|
|
|
Tips:
|
|
|
In the Group By window:
-
You can swap the selected dimension in the right pane with an available dimension in the left pane to quickly add it.
-
You can add all dimensions using a button.
-
To view key-level details (e.g., customers), group the data by the "List" option.
-
To view record-level details, group the data by Record Details, which is located after all keys/dimensions in the left pane.
-
You can add a custom group to create your own custom method for grouping and comparing data.
|